One of the most important tasks of a network administrator is to backup the network configuration files of every Cisco device periodically. This periodicity is dictated and established by the organization policies. Frequency could be every week, every fifteen days or every month depending on the needs of the organization.
The importance of the configuration files of the network can be seen from many administrative perspectives:
- Compare and validate configurations between devices.
- In case of any damage of the equipment, configuration files could be used to restore the operational state of the network with a simple copy and paste of the configuration in another device.
- To rollback configurations to a previous state.
Now, imagine a network with five devices, a backup in this scenario is very simple for a network administrator. Since only five devices reside in the network, you could access via console, telnet or ssh into the router and save the configuration in a TFTP server executing the following command on every device:
R1#copy running-config tftp://<SERVER_IP>/<CONFIGURATION_FILE_NAME/
But what if you have fifty or even one hundred devices? In this type of scenario it is hard to manually perform backups. The network administrator will be subject to what is often called “administration burden” because of the amount of devices that have to be manually accessed and executed the previous command. For this type of situation, you have a variety of external options available (third party applications), but one that is often overlooked by some network administrators that is part of the feature set of your Cisco device is the Cisco IOS Auto Archive Feature.
This feature was introduced into Cisco IOS Release 12.3(4), the Archive command enables the administrator to configure snapshots of the configuration files. The configuration is straightforward.
R1#conf t
Enter configuration commands, one per line. End with Ctrl+Z.
R1(config)#archive
R1(config-archive)#path tftp://172.16.1.10/
R1(config-archive)#exit
R1(config)#exit
In this case we entered into the global configuration mode and use the “path” command; this set the path to an external server, in this case a TFTP with the 172.16.1.10 IP address. These are the necessary commands in order to configure a basic Archive. To test our configuration we could execute the “archive config” privilege mode command.
R1#archive config
If the TFTP is operational, it should produce the following output.
R1#archive config
!!
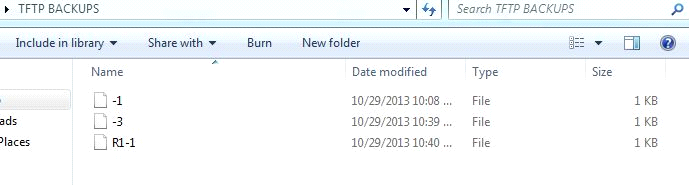
Now we can go to the TFTP directory in order to validate if the configuration was successfully sent.


And we see how the configuration file is stored as “-1”, this is because, by default, the Archive feature saves the configuration in increments of one. We can see this if we perform another manual configuration, save and execute the “show archive” command.
R1#show archive
The next archive file will be named
tftp://172.16.1.10/-3
Archive # Name
0
1       tftp://172.16.1.10/-1
2       tftp://172.16.1.10/-2 <- Most Recent
3
4
5
6
7
8
9
10
11
12
13
14
We see that in the history of the router, the archive tells us that configuration was sent to the TFTP with the name “-2” and is the most recent. In this output you can note that Archive can only maintain a maximum registry of 15 configuration files inside the router.
For administration purposes, the default naming convention is not very filexible, because it is not telling us anything about the device itself. If we want to rapidly identify a device in the directory, we can use the hostname of the device itself. For this we have two possible options: hardcode the hostname of the device or set a name variable using “$h” in order to automagically send the configuration name with the current hostname of the device.
Hostname in Path
R1(config)#archive
R1(config-archive)#path tftp://172.16.1.10/R1
R1(config-archive)#exit
Note that in this case, if the hostname of the device changes in the future to, let’s say, R2 the archive configuration will still send the configuration file with the name set to “R1”. For this purporses we have the second mentioned option.
Hostname Variable in Path
R1(config)#archive
R1(config-archive)#path tftp://192.168.2.2/$h
R1(config-archive)#exit
If we manually save the configuration and then execute the “show archive” command we can see the results of the configuration.
R1#archive config
!!
R1#show archive
The next archive file will be named
tftp://172.16.1.10/R1-2
Archive # Name
0
1       tftp://172.16.1.10/R1-1 <- Most Recent
2       tftp://172.16.1.10/-2
3       tftp://172.16.1.10/-3
4
5
6
7
8
9
10
11
12
13
14
We can visualize that the most recent configuration file sent is named as “R1-1” which has the index set to 1.

At this point, it is very easy for an administrator to manually backup the configuration files of the devices in the network, but the problem partially persists, because this is a manual process. If we want to sort of “overcome” this we can enable the “write-memory” command inside the Archive configuration mode. This allows the router to automagically perform the backup instead of manually saving the configuration.
Time Variable in Path
We could also configure a time variable in the naming convention of the archive configuration. This is to have the date in the name of the file in the TFTP backup folder.
R1(config)#archive
R1(config-archive)#path tftp://172.16.1.10/$h-$t
R1(config-archive)#exit
If we execute the “archive config” command we can see that the time is set in the name of the file.
Archive Write-Memory Option
R1(config)#archive
R1(config-archive)#write-memory
R1(config-archive)#exit
If we execute the “write memory” or “copy running-config startup-config” commands we can see that the configuration is automatically stored in the TFTP folder.
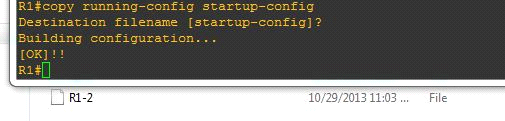

The “copy running-config startup-config” responds with “[OK]!!” which is the acknowledgement of the TFTP. With this operation, the local configuration changes are saved and automatically sent to the TFTP server.
If we need to save the configuration file every certain amount of time, we can use the “time-period” operation. This option allows us to perform the configuration backup every certain amount time, this way we don’t have to manually console, telnet or ssh into the device. The “time-period” option must be set in minutes, therefore if according to the organization policies, backups need to be executed every week, we would need to configure a time period of 10080.
Archive Time-Period Option
R1(config)#archive
R1(config-archive)#time-period 10080
R1(config-archive)#exit
The next backup will be performed in one week exactly (time in minutes), but what if we would like to configure this periodicity with an explicit date time? Unfortunately with the current Archive features, it is not possible. In that case we could combine the Archive feature with Kron Schedule.
Kron is a command scheduler used to automate tasks in the Cisco IOS Software. With Kron, we can set policies and use them once or with a certain periodicity. For this we configure a Kron Policy List and then apply an occurrence to the global Kron policy. Note that Kron does not work with interactive commands, meaning commands that have some type of dialog for validation. An example would be “copy running-config startup-config”. In this case, a dialog would appear in order to validate the execution of the sentence. Since we have this “limitation” with that sentence, we could use the “write memory” command which does not need any validation and use it in the Kron Policy.
R1(config)#kron policy-list CONFIGURATION_BACKUP
R1(config-kron-policy)#cli write memory
R1(config)#kron occurrence Backup BACKUP_OCCURRENCE at 9:00 25 recurring
R1(config-kron-occurrence)#policy-list CONFIGURATION_BACKUP
Now the router will execute the configuration backup every 25th at 9:00 AM.
https://learningnetwork.cisco.com/blogs/vip-perspectives/2013/10/30/understanding-cisco-auto-archive-feature-to-backup-configuration-file